The falcon 250 Pro is a great beginner FPV racing drone in many aspects because it uses decent gear, is ready to fly and is also a great price. However the fact that it does not include a comprehensive manual makes it rather difficult to use as your first quadcopter so in this post I will include a couple of things you need to do to get the most out of your falcon 250 pro. Also if you have any questions that I do not answer add a comment and I will be able to help. In general its not such a bad thing that you need to conifigure the quad a little before you fly, as that is what this hobby is all about and you need to learn at some point.
This guide serves as a basic setup guide to help you get your falcon 250 pro up in the air in no time. I will also write a detailed setup guide on how to do some more advanced falcon 250 pro setup guide that will include details on how to update the firmware, and change the UART ports and some minor PID tuning for the more adventurous FPV pilots.
Things to remember
Here are a few important tips to bear in mind when working with quadcopters and electronics
- Never configure your flight controller with the propellers attached (you could loose a finger!)
- Never power your quadcopter without the FPV antenna connected (although rare, you can end up blowing your video transmitter)
- Never over discharge your LiPo battery as this can damage it. Read more about Lipo battery care and usage.
- Dont turn the quadcopter off and on very quickly, as this can damage the sensitive OSD (on screen display) chip, always wait about 10 seconds when power cycling your drone.
In this guide:
- Configuring your Flysky I6 Radio
- Installing Cleanflight GUI
- Setting up Flight Modes
- Attaching the FPV Antenna
- Using the FPV Video Transmitter
- Charging your Battery
- Securing your Battery
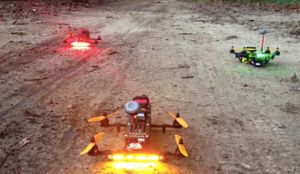
- Falcon 250 LEDs
- Falcon 250 Pro OSD (on screen display)
- Attaching your Propellers
- Advanced (swap OSD UART Port) – something I suggest you consider doing

Configure the Flysky I6 radio
The first thing we need to do is to configure the R/C controller properly to make use of the switches to change between flight modes. To do this you need to turn the radio on into programming mode to access the menu (some flysky radios do not need this, but its no harm to try anyway).
- While holding the yaw trim to the right, and the roll trim button to the left (also known as the Vulcan salute).

- Once the radio has booted up long press the ‘OK’ button on the right until a menu screen appears.

- Using the up and down buttons on the right, select the ‘Functions Setup’ menu (wrench and screw icon) and press OK.

- Select the ‘Aux. channels’ option and press ‘OK’.
- The flysky i6 radio has the option for 2 auxiliary channels, channel 5, and channel 6. However by default channel 5 source is the ‘VrA’ knob, and we need to change that to ‘SwC’ as shown in the image below.

Unfortunately there are only 5 channels connected between the receiver and the flight controller on the falcon 250 pro so you cant use all 6 (unless you connect it, but its not required). But for now you might as well set the channel 6 to be ‘SwA’ (two position switch that can be used in the future)
- Once the Aux channels have been setup (as in the image above) long pres the Cancel button until you hear a beep to save. Yes I know its weird but that is what you need to press to save the settings.
Below is a video that is largely a repeat of the above information in video form, but it also goes onto show you how to bind your radio to your receiver should they unpair. It also shows you how to setup the failsafe on your radio (more on that later)
Installing cleanflight GUI
Now you need to connect your falcon 250 pro to your computer via USB and configure it with the flight controller software which is called cleanflight configurator. Cleanflight is a chrome web app that you need to install (download here)

Once the falcon is connected your PC via micro USB cable, your PC should install the required drivers to talk to the board, if not you will probably need to install them yourself. Dont worry as there is a great software tool that will do this for you called the impulseRC driver fixer

Setting up beginner flight modes
Due to the strange wiring of the falcon 250 pro, they have connected the OSD module to the same port as the USB, so this means that if your quadcopter is powered via battery at the same time as USB the flight controller gets confused. So for now when configuring your flight controller make sure the battery is disconnected. It is however very easy to swap the OSD to another port on your flight controller which I discuss here, which is well worth doing.
- Once your board is connected to cleanflight, go to the modes tab and since we only have one extra channel you should setup the main one to be ‘HORIZON’ mode, as in this mode the quadcopter will try to keep level, making it easy to fly.

- On the same Aux 1 channel you can also set ‘ANGLE’ mode as shown in the image. This means that when your ‘SwC’ switch cause the following behavior:
- ‘SwC’ up – falcon 250 pro will try to keep level (beginner mode)
- ‘SwC’ middle / down – falcon 250 pro will enter angle mode (maintain current angle)
Feel free as you advance to use three flight modes, or try other modes, but to start only fly in horizon mode until you become more comfortable. You can read about all the cleanflight file modes on the wiki
Once complete make sure to press the button in write the modes to your flight controller EEPROM. You can test these are working correctly by disconnecting the USB, connecting your flight battery and seeting the flight mode via the FPV feed as the OSD will display the current flight mode.
Attaching the FPV Antenna
Before plugging in your battery make sure that you first securely connect the antenna at the back of your quadcopter. You might need to use some pliers to ensure the nut is secure (but also take care not to over-tighten it which can cause the connector to come off the video transmitter). You will know it is tight enough when it can stay upright vertically on its own.

Video Transmitter Setup (VTX)
The video transmitter inclded with the falcon 250 is great as it can switch between a total of 40 channels. This does not matter too much if flying on your own, but if flying with other FPV pilots you need to make sure that you are on a very different frequency to them, otherwise your video feeds with interfere with one another. The full table of frequencies is shown in the table below.

To change the channel (CH1 to CH8) you simply press the button on the side of the VTX module. The current channel is indicated by the top row of LED’s. To switch between the channel groups (A,B,C,D,R) you long press the button, this is indicated by the bottom row of LED’s.
If flying with other FPV pilots never turn on your VTX if anyone else is currently flying as there is a slight chance your VTX will be on the same frequency, resulting in the pilot loosing his video feed and ultimately crashing his quad.
To pick up the video feed you just need to set your FPV goggles to have the same channel as your VTX. But today most FPV gear has the ability to auto-scan across all the channels to find the frequency your VTX is currently using.
Charging the battery
To charge your battery you simply need to plug in the B3 charger to a plug point, and then plug your balance lead of your battery into the charger and wait. Once the battery it fully charged all three LED’s on the B3 charger will go green. This ensures that all three cells in your Lipo are balanced and fully charged.

Mounting your battery
The battery is simply mounted onto the top of your falcon 250 pro using the included Velcro strap as shown below. Make sure that you secure the balance lead is secured properly as you dont want that to come loose mid flight and get caught in between the propellers which will damage your battery and cause a crash.

LED DIP Switch
On the bottom of the falcon 250 pro you have red DIP switch that is used to control your LED’s.

The function of each of the 4 switches are as follows
- Tail LED on/off switch
- Motor LED’s on/off switch
- Front LED on/off switch
- Master on/off switch. This is also connected to the flight controller and OSD so if you turn this off, your flight controller will also turn off. As mentioned as the start of this article, please take some care when moving this switch as you dont want to turn it off/on too quickly as this can damage the OSD module.
On screen display module (OSD)

The best part of the falcon 250 pro is the built in OSD module. This overlays important information onto the video feed that include things like your motor arm status, current flight mode (top left corner), battery voltage (bottom left corner) among others.
Its also worth noting that you can configure some of the settings on your flight controller via the OSD menus and your R/C sticks. Full details on this is a topic for an entirely separate guide.
Attaching the propellers
The final thing before going out to fly is to mount your propellers. Since the motors spin clockwise (CW) and counter-clockwise (CCW) its important to attach the correct propeller to the correct motor. On each prop you will see some writing which will let you know what direction they are supposed to spin as shown in the photo below.

- 5x45R props attach to the clockwise motors
- 5×45 props attach to the counter-clockwise motors
Advanced (change OSD UART port connector)
As mentioned at the start of this guide, an very frustrating assembly decision by eachine means that you cannot have battery power to your quad at teh same time as it is connected via USB to cleanflight as the USB and OSD share a UART port. In particular if you need to test your R/C receiver is working correctly (power via battery) then it is not possible directly via cleanflight.
- To do this you will need to remove the top plate of your falcon 250 pro by removing the top screws to reveal the insides

- You now simply need to remove the 4 wire OSD to FC connector cable from the bottom of the flight controller (UART1 Port) and connect it to the one above it (UART2 Port). Also notice that the connector has been flipped around so that it will fit into the upper connector.
- In the photo below I have removed the OSD module to make it clearer to see, but if you can avoid this it will be better not to remove anything. If you do make sure to use some new double sided tape to secure everything down again, making sure nothing has any contact to cause short circuits.

- Now carefully attach the side plates and the top plate back onto your falcon 250 pro

- Now connect back to cleanflight and go to the ports tab to set UART2 to be used for the OSD and enable MSP telemetry on that port

Now you will be able to connect to cleanflight at the same time as having your battery connected so you can do other functions like test your receiver, or the test/calibrate motors/ESC which I talk about in my next article on updating the firmware on your falcon 250 pro.
If you have any questions, problems or suggestions please add a comment so we can make this the most comprehensive guide for the falcon 250 pro.