The latest ArduPilot AP_Periph firmware (v1.5.1+) and DroneCAN GUI tool (v1.2.22+) allow connecting uCenter directly to a DroneCAN GPS like the F9P. This makes it possible to update F9P firmware completely over DroneCAN, without needing direct USB access.
In this tutorial, we’ll walk through step-by-step how to use these new features to connect uCenter to an F9P GPS and flash new firmware over DroneCAN.
Overview of the Firmware Update Process
The key tools we'll be using are ArduPilot's DroneCAN GUI in configurator mode and the u-Blox firmware updater in Mission Planner or ArduPilot SITL. The DroneCAN GUI allows forwardingserial data from the GPS over DroneCAN so Mission Planner can communicate directly with the GPS. With special handling enabled, we can then use the u-Blox firmware updater to send the new firmware image.
To follow along, you'll need:
- Drone running ArduPilot (v3.5.7+)
- F9P GPS module accessible via DroneCAN (HolyBro F9P)
- Latest DroneCAN GUI and AP_Periph firmware
- uCenter installed on your computer
- F9P firmware file (usually ubx_f9p_1_32_XX.bin)
The GPS also needs to be running AP_Periph firmware 1.5.1 or later.
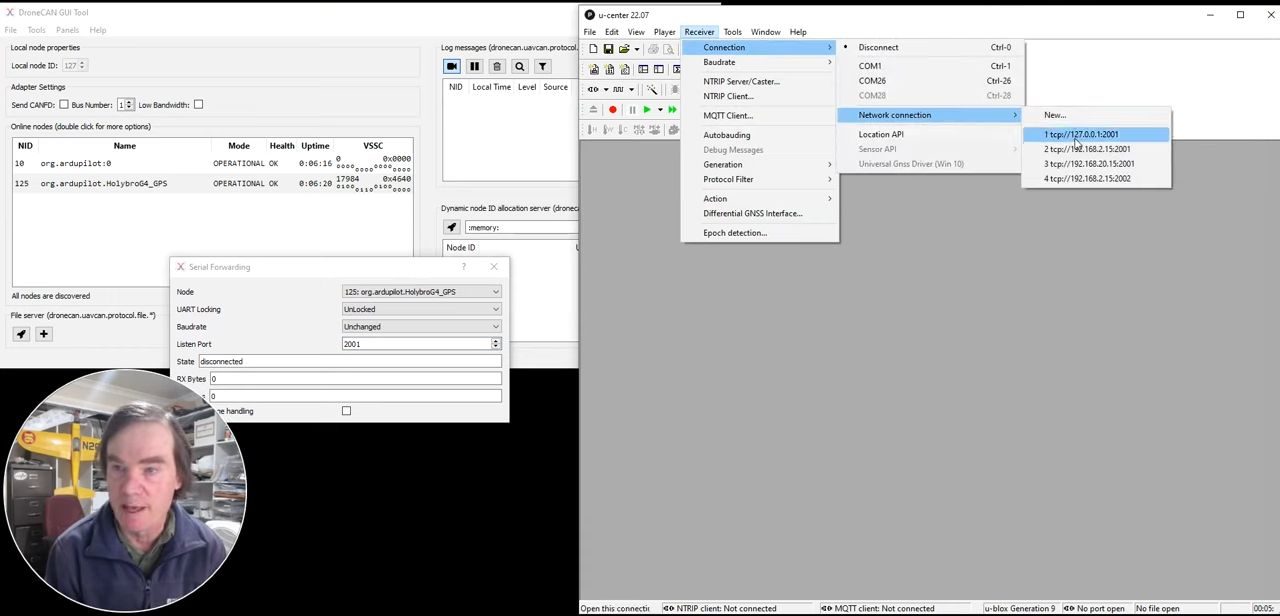
Step 1: Connect with the DroneCAN GUI
After connecting your computer and flight controller by USB, start the DroneCAN GUI tool. Go to the Serial Forwarding tab.
Select your GPS node, for example a Hollybro G4 GPS. Set the mode to "Unlocked" to start. This will share access to the GPS between ArduPilot and Mission Planner.
Enter TCP Port 2001 under Receiver Connections to match the Mission Planner default. Click Connect. You should see the bytes transferring indicator active and connection status show green.
Step 2: Monitor GPS Data in Ucenter
Now open Ucenter and go to the messages screen. Select the Reciever>Connection>Network Connection> add a new connection to TCP 127.0.0.1:2001. This will connect to the forwarded serial data from DroneCAN.
Go to the Messages console (F9) and you should see u-Blox messages appearing! For example, you can view detailed signal info, satellite info, and configuration details.
This confirms we have access to the GPS via DroneCAN forwarding.
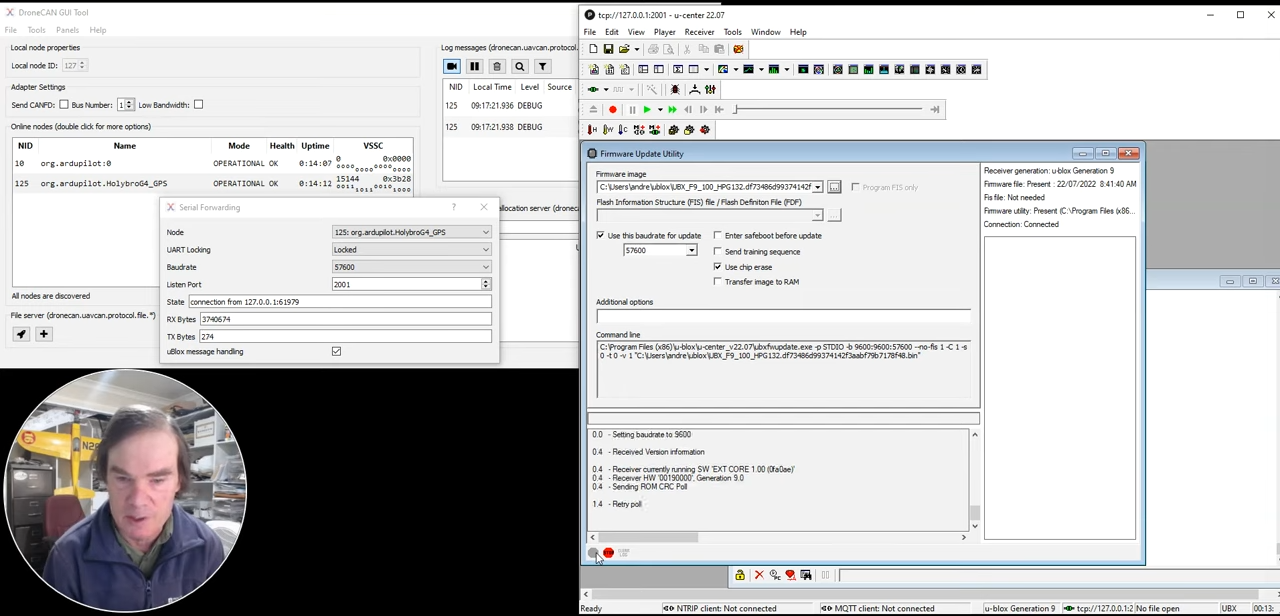
Step 3: Take Exclusive Control
To update firmware, we need exclusive control of the GPS. In the DroneCAN GUI, change to "Locked" mode. The port number will change as it allocates a new random port.
Now only Ucenter will communicate with the GPS, not ArduPilot. You'll see ArduPilot warning messages in the DroneCAN GUI as it loses access.
Step 4: Configure UART Settings
For best firmware update reliability, we need to configure the GPS UART speed to 57600 baud.
In Ucenter , go to u-Blox Configuration -> Port and query the current setting. Change this to 57600 and click Send.
Verify the change took effect by checking the port value. Also query another register like Mon/IO to validate communications at the new baudrate.
Step 5: Upload New Firmware
Open the u-Blox Firmware Update window. Select your firmware file (usually ubx_f9p_1_32_XX.bin).
Make sure options are set to:
- Use boardrate for update: checked
- Boardrate: 57600
- Use chip erase: checked
Click Start Update. The tool will begin erasing and flashing the firmware blocks.
Step 6: Monitor Progress
The updater will display a grid showing the status of each flash memory sector. Green means written and acknowledged, yellow is pending acknowledgement.
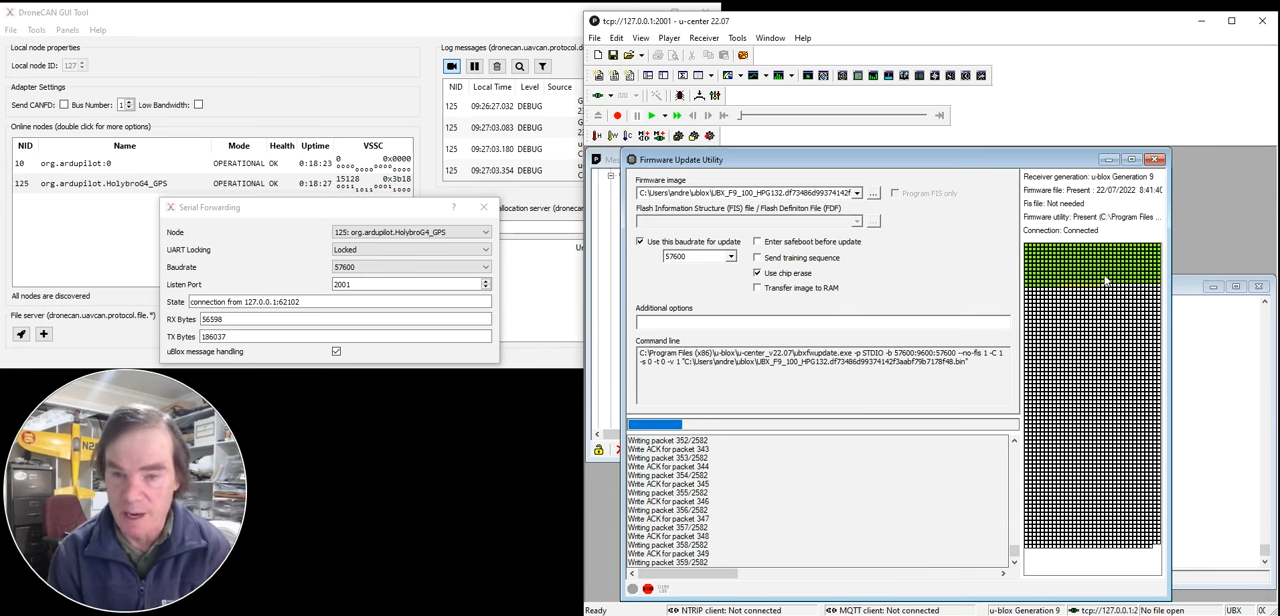
This process takes several minutes to complete. Try to minimize DroneCAN traffic during the update, as excessive bus load can cause timeouts. Consider stopping MAVLink streams temporarily.
Once the entire grid turns green, the firmware update is complete!
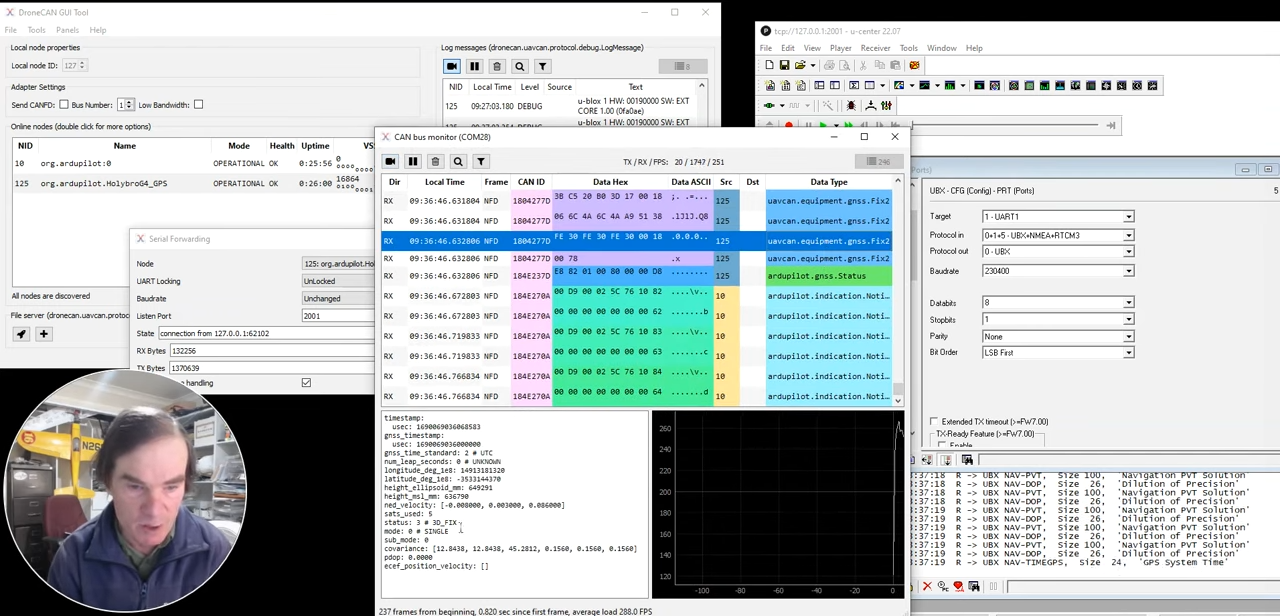
Step 7: Restore Normal Operation
Now we need to give control of the GPS back to ArduPilot. In the DroneCAN GUI, change mode back to "Unlocked".
ArduPilot will automatically re-initialize the GPS at the normal 115200 baud. Double check the u-Blox port setting reverted in Ucenter.
Tips for Troubleshooting
Here are some tips in case you run into issues:
- Always do firmware updates at 57600 baud for best reliability. Slow and steady!
- If the update fails, go back to Unlocked mode. ArduPilot will re-probe the GPS and restore normal config.
- Watch for overloading the DroneCAN bus. Reduce streaming rates if needed.
- The u-Blox handler helps packetize data. Updating without it is less reliable.
- Consider wiring a USB-to-UART cable temporarily to avoid DroneCAN altogether.
- Use the DroneCAN stats panels to monitor bus health during your testing.
So, with the DroneCAN serial forwarding capability, you can now update GPS firmware over the CAN bus! This is handy for units that lack a USB port and saves having to crack open the enclosure. As always, remember these advanced features are still being actively tested and improved. Please provide any feedback on your experience using the ArduPilot forums!