This month, as those of you who have come here from the letter included in your C.R.A.P. box will know, we sent out an entire PNP whoop to everyone that purchased one of our Novem-boxes!
This quick article is a simple guide following our own build along so that you can refer to it as you’re making yours.
Prefer to watch a video?
If you prefer to watch a video of the build we have two options thanks to the awesome FPV community!
Now onto the written build guide
First off, we mount the FC/ESC Combo to the frame. Part of the frame can get in the way of the motor connectors later on, so you might want to plug them in beforehand. I didn’t, as it wasn’t too much of a hassle to work around.
To mount the FC, you first need to install (press-fit) the 4 included soft rubber mounts onto the frame as shown in the picture below. We didn’t, and it isn’t necessary, but you might want to cut them down a mm or so. Make sure the groove on the rubber parts is closer to the top than the frame, as this is what the FC mounts to. There’s a point moulded into the frame, we placed this as the front of the whoop. The battery pads on the FC are at the back.

Next up, we soldered the battery wires. Bat + on the left (shown in the image below) and BAT – on the right.

Moving on, we are going to solder the camera/VTX combo to the board. Luckily, you have video in and out – which is good for us as even though we’re using a combo, we’ll be able to utilise the Beecore_BL onboard betaflight OSD.
Initially, we had wired our video wires like shown in the first image in this guide. However, we had later found that the pinout we had available for our Camera/VTX was incorrect, or our part was – as the video wires were reversed. This meant that (according to the pinout diagrams) we had to wire Video in on the FC to video in on the cam/VTX, and the same with video out. Odd. We’re not sure if this will be the same for everyone, so you may have to swap yours over if your video feed is black.
The wires should be in this order:

Next, the last bit of soldering – the receiver. We’re using an FrSky XM receiver, and it is super simple to wire up. There are 5v and 3.3v pads available on the FC, so make sure you know which to solder your receiver to!
In my case, I will be using 5v.
Wiring for the XM should look like this:

As you can see above, I have mounted my XM to the top of the board with some double sided foam and used short cable runs to keep the receiver neat. The antenna can poke out the canopy later on, or you can mount it however you would like. Just keep in mind that your antenna is light, flexible and prone to damage from the props.
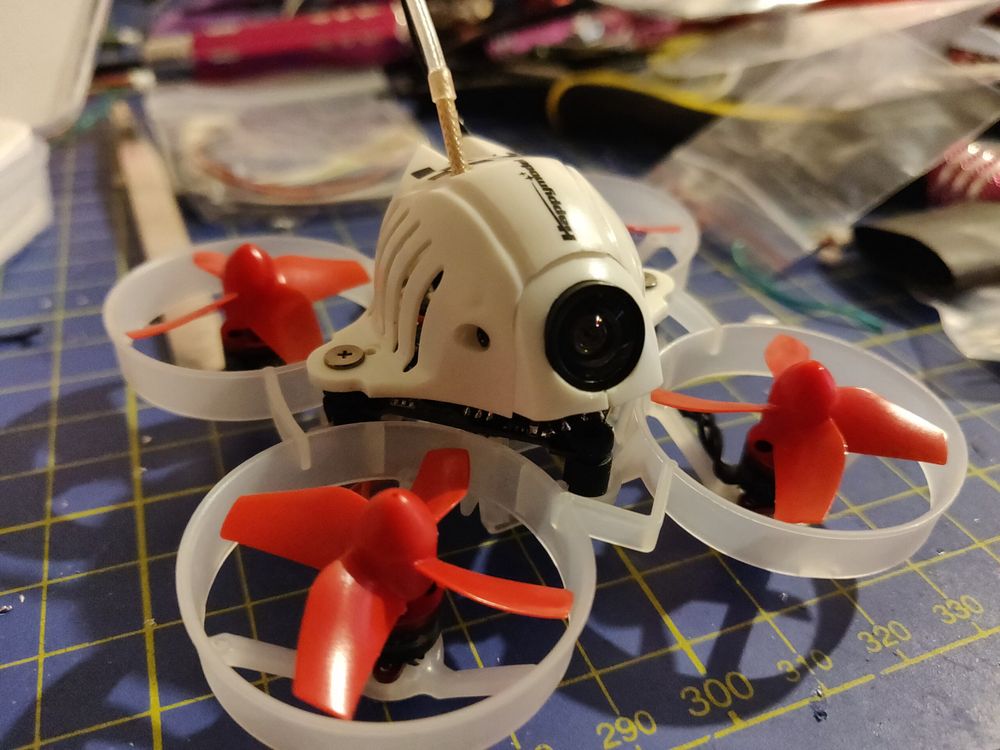
Now, we need to install the camera into the canopy. Make sure your receiver is bound before you do!
First, press fit the camera into the small camera surround piece like this:

Next, I carefully bent the VTX antenna back a slight amount to make installation into the canopy at the camera angle I wanted a but easier:

Finally. slide the surround into the canopy piece and use the smallest included screws to secure the two together:

At this point, I slid the XM antenna through the canopy and lowered everything down on to the frame, being careful not to pinch any wires. The canopy is screwed onto the frame using the larger included silver/gunmetal coloured screws at the sides and back:

Finally, the motors.
These are a bit of a nightmare to get the securing screws into at first, but after getting into a bit of a rhythm things get easier. Be careful to route the motor wires so they won’t easily get hit by damaged props! The motors connect to the FC/ESC combo with a simple connector:

Once all four motors are in and connected, press fit your props (we recommend props out for tiny whoops, it may be snake oil – or it may not, but all the cool kids are doing it) and you’re done with the build!
You will need to check your motor directions in betaflght (target OMNIBUS) and BL Heli configurator, as well as performing a basic betaflight setup – including OSD, but once that’s all over you’re good to go!
We’re running 4k/4k and DShot 600.
If you’re having a hard time getting a setting to stick, you may need to clean flash the board.
Hope you like the whoop, and happy flying! 😀
- The Unmanned Tech Team

If you enjoy the content and want to get involved with what we think is the best online FPV community on the web, be sure to check out our forums and pop in to say hi on our discord server!


