Unmanned Tech have just started stocking the LR1000 Mini Receiver for FrSky from Furious FPV and we figured there should be a configuration guide for this great receiver.
The range on this thing is one full kilometre and it is packed full of cool features. It has a S-bus output without inverter, 8 channels of output (with a 9th channel dedicated to RSSI), a telemetry hub and full compatibility with FrSky Taranis, Taranis Plus, & XJT Module. Not bad.
Anyhow, let’s get on with the useful information…
Binding the receiver to the Frsky Taranis
- On the Taranis, go to MODE SETUP (page 2) in the model configuration.
- Go to Mode inside Internal RF and select D8.
- Press and hold the receiver bind button and turn the receiver on (by plugging in your battery).
- Release the button. A green LED light should light up on the receiver.
- Going back to the Taranis; press BIND. The transmitter beeps, indicating it’s in bind mode.
- Wait for the green LED on the receiver to turn off. The binding procedure has finished.
- Exit the BIND mode in the Taranis.
- Unplug the battery to turn off the receiver.
Binding the receiver to the XJT module
- Using the dip switches on the XJT module, select the D8 mode. They should be in the following position: switch 1 = ON, switch 2 = OFF.
- Press and hold the receiver bind button and turn the receiver on (by plugging in your battery).
- Release the button. A green LED light should light up on the receiver.
- Press and hold the bind button and turn the transmitter on.
- Release the button. A green light should blink on the module, indicating it’s in bind mode.
- Wait for the green LED on the receiver to turn off. The binding procedure has finished.
- Turn the transmitter off.
- Unplug the battery to turn off the receiver.
Receiver Configuration in the Cleanflight configurator
- In the PORTS PORTS tab, select the UART that corresponds to the receiver (usually UART3 in F3 flight controllers) and activate Serial RX.
- Save by clicking on the Save and Reboot button.
- In the CONFIGURATION tab, in the Receiver Mode section, select RX_SERIAL.
- In the same tab, in the Serial Receiver Provider section, select SBUS.
- Save by clicking on the Save and Reboot button.
- Go to CLI and type the following commands:
set sbus_inversion = OFF
save - The FC will reboot, applying the change.
- Go to the RECEIVER tab and make sure the receiver acts like it should.
Telemetry Configuration
- In the PORTSPORTS tab, select the UART that corresponds to the telemetry (usually UART2 in F3 flight controllers) and select FrSky in Telemetry. Leave the baud rate on AUTO.
- Go to CLI, and type the following commands:
set telemetry_inversion = ON
save - The FC will reboot, applying the change.
- Make sure you’re getting the telemetry values in our Taranis correctly.
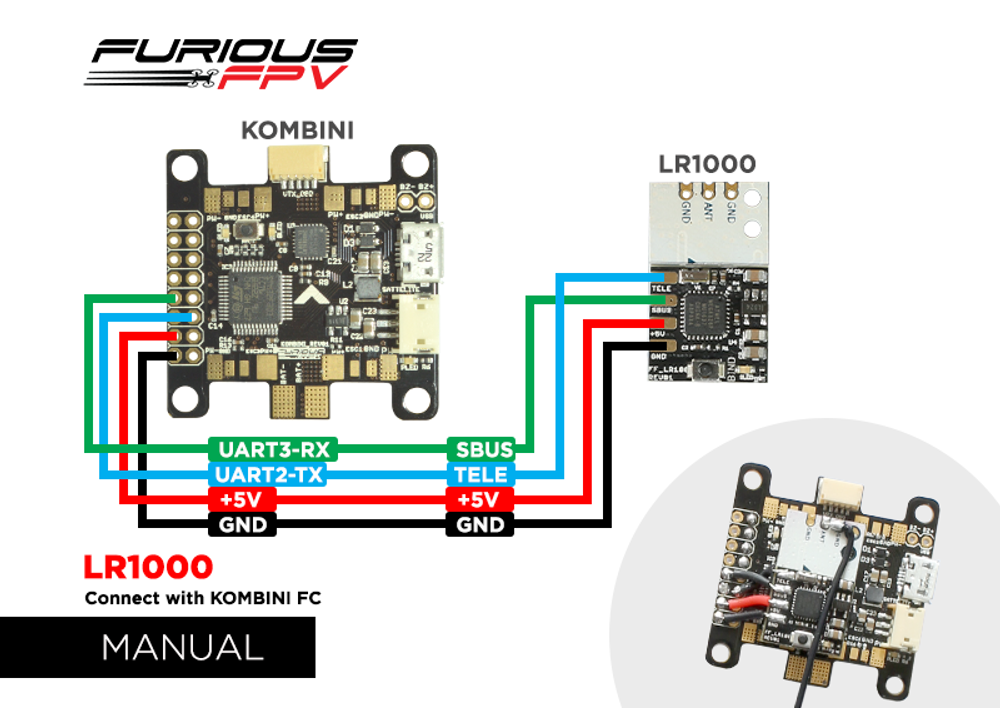
Connection Diagrams for Various Furious FPV FCs