This is short guide that takes you through the bare essentials of setting up any quadcopter (i.e. any flight controller) with BetaFlight as quickly as possible. To reiterate, we’re just going over the basics – that means no fancy PID tuning or optional extras like setting up LED’s!
This guide is aimed at beginners and if you have any questions about the guide, please let us know in the comments section at the bottom of the page.
🚨 Warning:
Before performing any configuration on your quadcopter make sure to remove the propellers first. Failing to do so can result in serious injury.
First Things First

The first step you should take is in the ‘Setup’ tab. Here you will find a button that says ‘Calibrate Accelerometer’ – and this is exactly what you should do. To do this right, you need to make sure your flight controller is stationary on a very level surface, then click the ‘Calibrate Accelerometer’ button. After a few seconds it will complete.

It is also a essential to check that BetaFlight knows the correct orientation of your quad. This could be incorrect at first because the flight controller may be mounted upside down, back to front, or otherwise misaligned. If you head over to the ‘Setup’ tab, you will see a 3D model of your quad in the middle of the screen. This should move correctly in relation how you move it in real-life. So if you tilt it down, the 3D model should also tilt down.
⚠️Note:
The green arrow on the 3D render should be on top of your quad and indicates the forward direction of your quad in real life – it may not point in the same direction as your quad, however, as long as your quad tilts in the correct direction relative to these two reference points (you tilt forward and the green arrow tilts forward) you’re okay.


If everything looks correct here you can move onto the next step. If not, you will need to tell BetaFlight the correct orientation. This is done in the ‘Configuration’ tab and, more specifically, in the ‘Board and Sensor Alignment’ box. You will then need to change the angle (in degrees) until the model moves correctly. The most common correction needed is to add some Yaw offset. So if the model on screen rolls when you pitch the quad forward, you will need to change the yaw degree by 90 degrees. You can correct it by trial and error if you don’t know the correct degree change instantly. A useful tip is to use the drop down box to select a preset angle offset. Remember to hit ‘Save and Reboot’ after you make the change, otherwise it’ll reset to defaults after you move off the tab.

Setting Up Your Receiver
Next, we’ll move on to setting up your receiver on your quad. Before following the procedure I’m about to set out, please make sure that your receiver is bound to your radio transmitter, and correctly connected to your flight controller. Otherwise, none of this will work… If you are unsure how to do this, check out your receiver and/or radio manual. We’ve also created several little guides that should help to take you through these processes:
What type of receiver are you using?
So, what receiver are you using? You are likely to be using one of the following brands: FrSky, FlySky or Spektrum. If you’ve got an FrSky receiver, you’re likely to have either a PPM or SBUS receiver. For FlySky, it’s likely to be PPM, SBUS or IBUS, and for Specktrum, you will have either DSM2 or DSMX. It is important to know this, as the settings are specific to each receiver.
📖 If this is like another language to you, check out our R/C receiver protocols guide!
Once you’ve established what type of receiver you’ve got hooked up to your quad, you can go to the corresponding section below to see how to set it up in betaflight.
PPM Receiver

Configuring a PPM receiver in betaflight is very easy. All you need to do is go to the ‘Configuration Tab’ and scroll down to the ‘Receiver’ section and select PPM RX as the receiver type. Assuming that your receiver is connected to the correct PPM in pin on your flight controller, and it is bound to your radio, it should now work. Don’t forget to hit the Save button in the bottom right of the screen to apply the settings.
SBUS/IBUS/DSM Receiver (Serial Receiver)

If you are using a SBUS, IBUS, DSM. receiver, you will need to go to the ‘Ports Tab’ to enable the the ‘Serial RX’ column. The important thing here is that you will have to enable it on the corresponding UART port that your receiver is connected to. You can have a look at your FC manual for the pinout of your board to gain this information.
In this picture shown, we are using a FrSky SBUS receiver (the X4R) and so we have enabled the Serial RX on UART6. Once selected don’t forget to save the settings.

To finalise your receiver setup, you then need to go to the ‘Configuration Tab’. In scroll down to the receiver section where you will need to tell betaflight what type of receiver you are using.
- First select the Receiver Mode to Serial-based Receiver
- Then select the Serial Receiver Provider to one of the following (dependant on your receiver type):
| Serial Receiver Manufacturer | Betaflight Setting |
| Frsky | SBUS |
| FlySky | IBUS |
| Spektrum (Satellite, DSM, DSMX) | SPEKTRUM1024 or SPEKTRUM2048 depending on your exact receiver model |
| TBS Crossfire | CRSFDon’t pay attention to the absolute position of the quad on the screen i.e. if your quad is pointing ‘forward’ and this isn’t replicated on screen, don’t worry about it. |

Depending on which receiver you are using, select the appropriate options from the two dropdown menus. Once done press the save and reboot button to apply the settings.
⚠️Note:
If you are unsure of the type of receiver you are using, you can select one and see if this is the correct one – this will not break your FC at all.
Check Your Receiver Is Working
Now that you have configured the settings, it is worth checking that is is working properly at this point. Depending on your flight controller you will likely need to plug in your Lipo battery to provide power to your R/C receiver.

To test the reciever go to the ‘Reciever Tab’ in betaflight. On this screen you should see the bars moving as you move the sticks and switches on your R/C transmitter. If not, double check your receiver has power, and is bound to your radio. If it still does not work,double check the port and receiver settings in betaflight (as discussed in the previous section).
If you find that your channels are not mapped correctly (e.g. the roll bar on screen moves when you toggle the pitch stick on your radio), then you need to map the channels. We have a video on how to map the channels for guidance.
You may also find that the end points of your channels are not the correct values. Every channel should start at 1000 and end at 2000 (or as close as possible). Every channel should also have a mid-point of 1500. If this is not the case, check out our Radio Receiver Range Calibration for BetaFlight video.
Failsafe Setup
Setting up your fail-safe is critical to avoid you loosing your drone due to a fly away. This it mainly something you actually set on your R/C radio. Basically you need to set your throttle channel to output a value below 885 in order for the failsafe to activate. This is the default failsafe setup in Betaflight so you do not need to change anything within the software if your radio have been configured. Your R/C transmitter manual should provide details on how to do this.

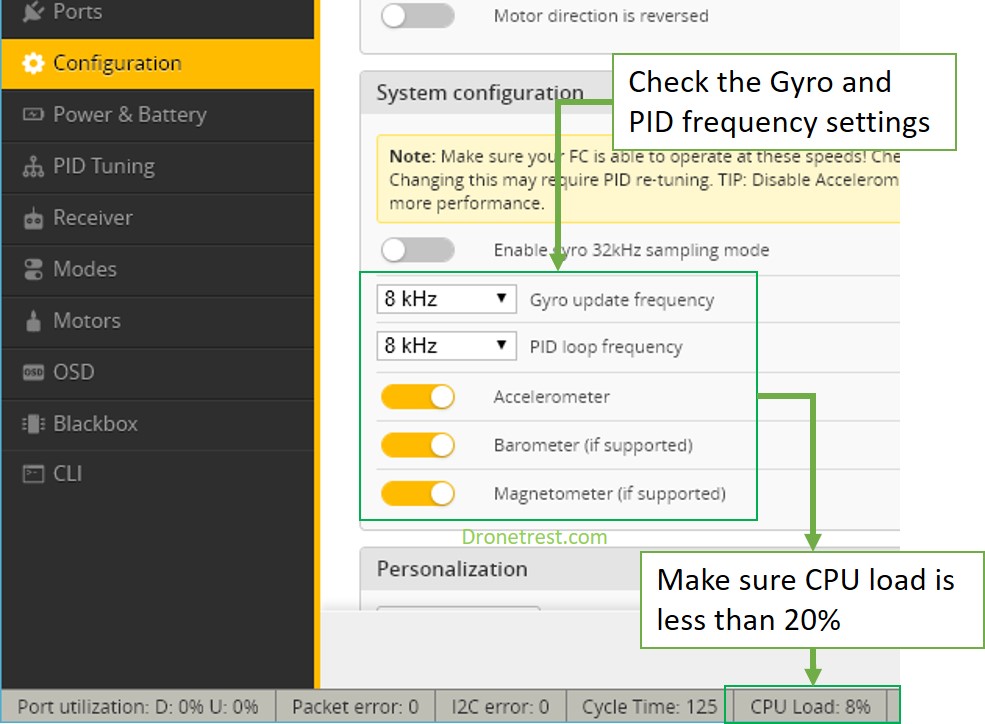
System Configuration
Now that the receiver has been setup, we can now move onto the fine tuning of some settings within betaflight. To start we will check the system configuration box in the ‘Configuration Tab’
Here, you can select your gyro update frequency and PID loop frequency. For most F4 flight controllers I suggest setting both to 8kHz. Once you do this you will need to save and reboot your flight controller. However, you must also actually unplug your flight controller for the gyro update to be applied. Once you have reconnected double check your CPU load along the bottom bar, as you do not want it running much higher than 20-30% at this point.
Other Features
We can move on to ‘Other Features’ now which comprises of…other features. Here you can select extra features you want to enable on your quadcopter. As a beginner you don’t need to do much here, and as you get more confident you can read up about what each feature does to test it out. But there are a few you should make sure are enabled.

- BlackBox: Logs your flight data and is generally something you should always enable if your flight controller supports it (99% of boards do). This will let you (or someone else) diagnose any issues if you crash or your quad is not flying quite right.
- SDcard: If your FC has a SD card slot, enable this function to record the blackbox data onto a SD card which has more memory than a built in blackbox.
- Other features to revisit at a later stage are Anti Gravity and Dynamic Filtering, both of which can improve your quadcopters flight performance if setup correctly. But as a beginner I suggest you stay away from this until you have read up about it first.
Remember to hit save and reboot to apply your new settings.
ESC and Motor Configuration
The next thing to check is your motors and ESC settings. First we need to tell betaflight what type of ESC you are using ‘ESC/Motors Feature’ box in the ‘Configuration Tab’.
Here you need to specify what protocol your ESC’s are using. This will obviously depend on what specific ESC you are using (see the ESC specifications about which protocol they use). You can choose from Oneshot, Multishot, Dshot, and Proshot. Pretty much all BLheli_S ESC nowadays run on Dshot600, so I suggest you start with this value if you are not sure. If you are using a BLheli32 ESC, then select Dshot1200.
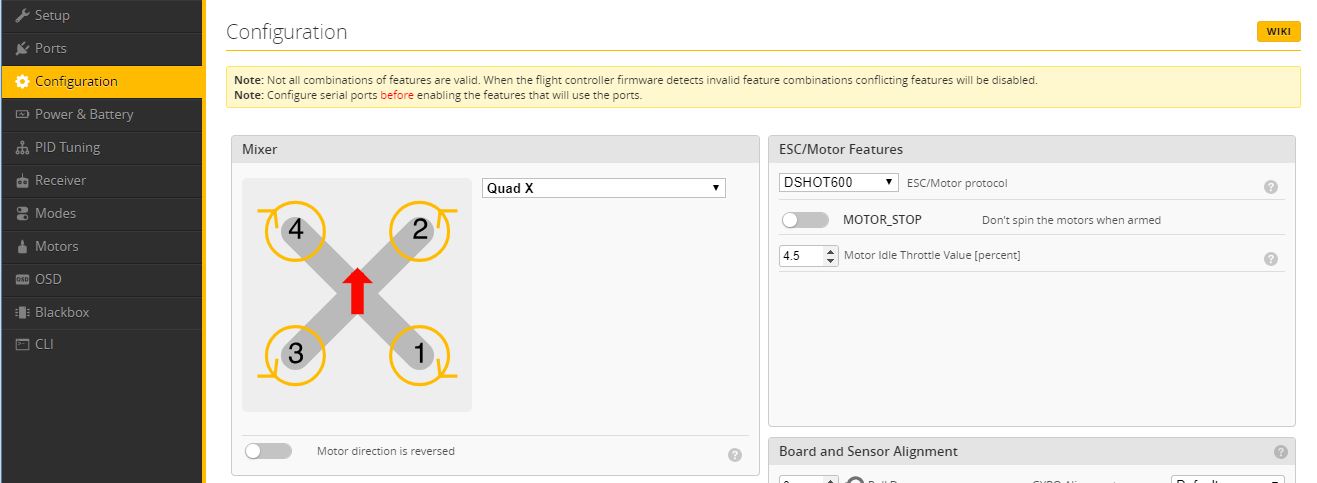
Again if you cant find any information about your ESC, you can try a protocol to see if it works or not. This is discussed in the next section.
Check motors and orientation
Now that you have selected an ESC protocol, it is a good idea to actualy test if your motors are working correctly, and spinning the correct way around. To do this you go to the ‘Motors tab’
On the motors tab there is a top view of a quadcopter. This indicates the motor order (with a number) and the spin direction (with the yellow circle). On this screen you are testing that the motors work, but also the order and spin direction.
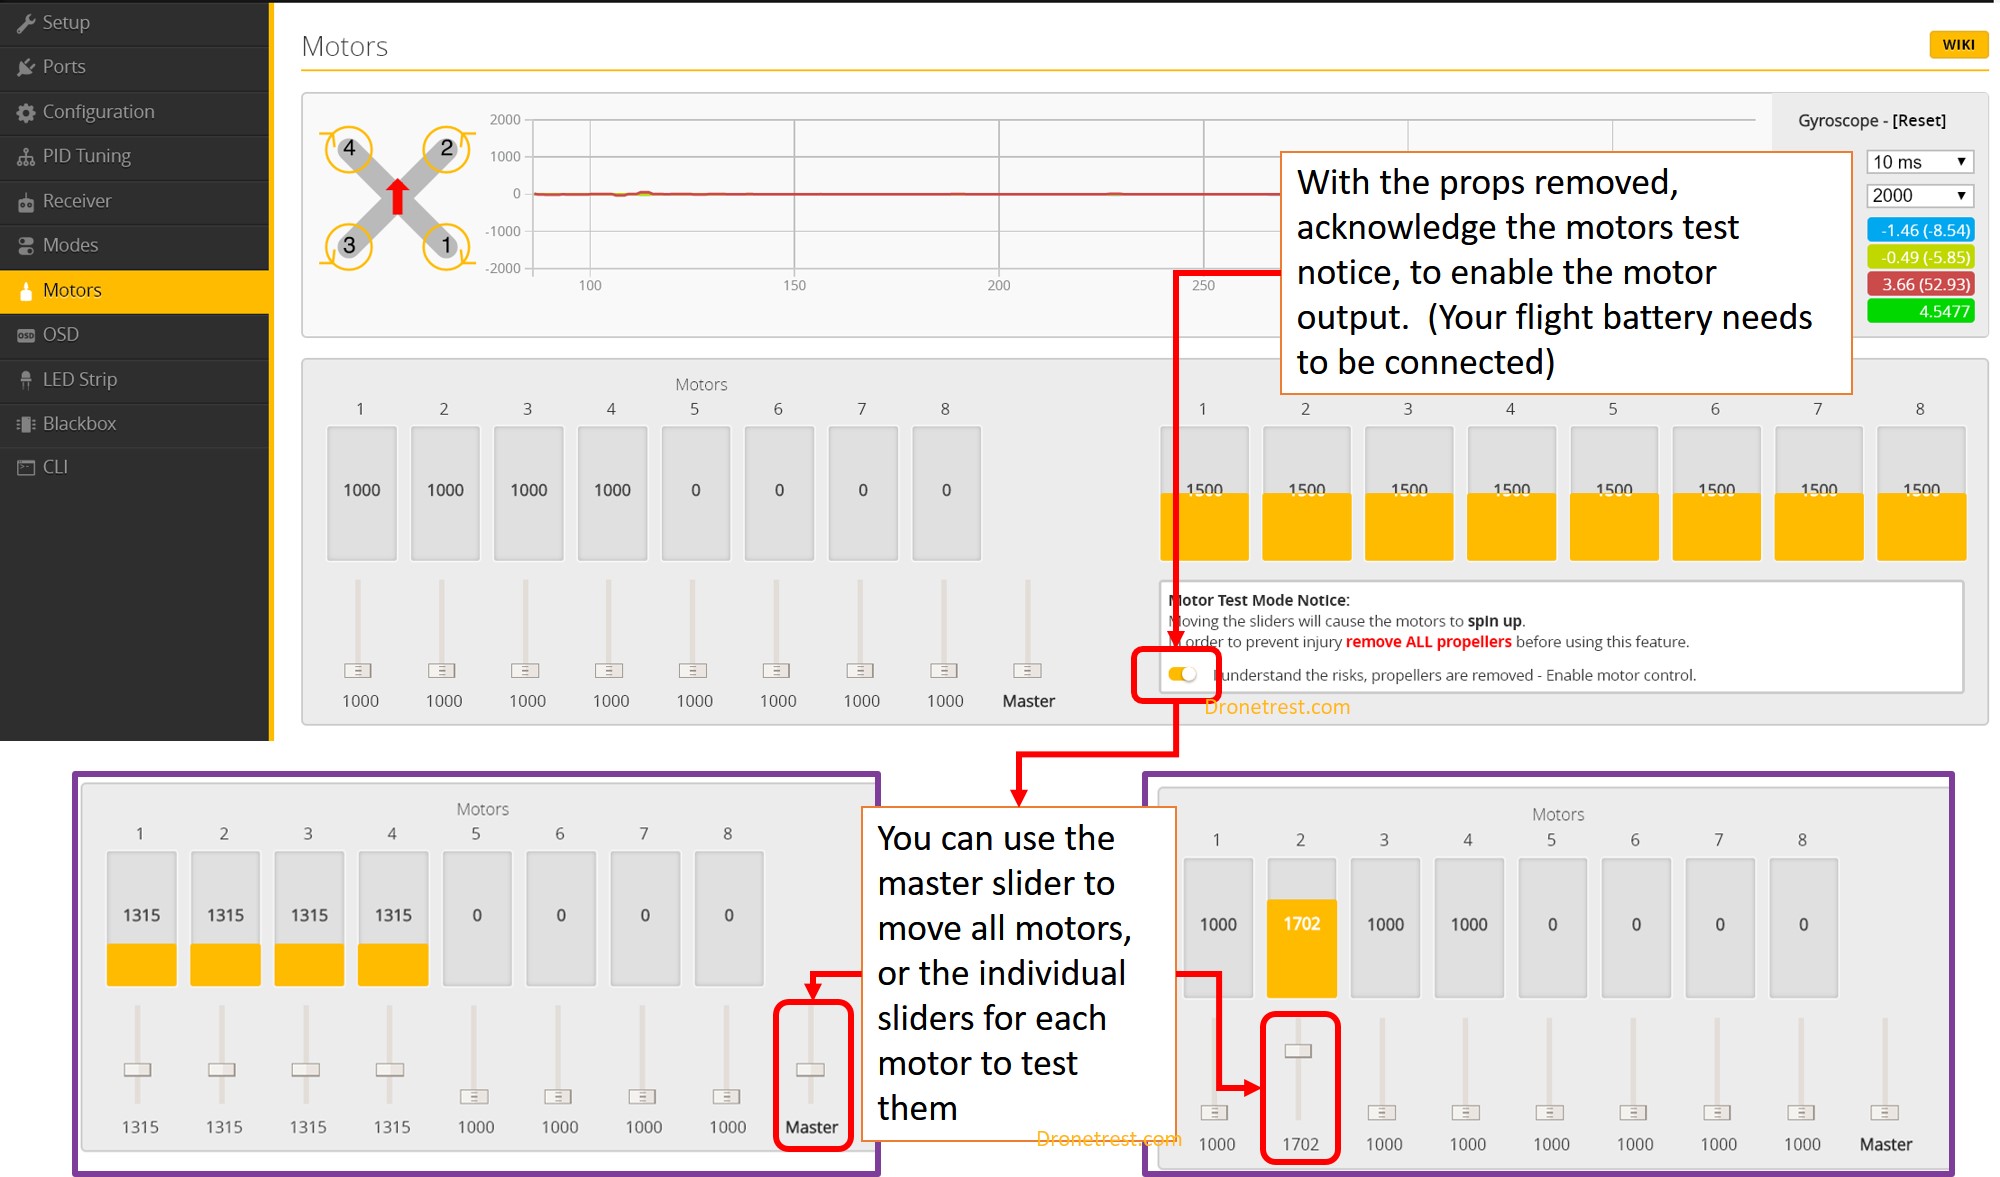
You can use the mast slider to quickly test that all the motors are working, this confirms you have selected the correct motor protocol. The next thing to test is to make sure that all the motors start spinning at the same time. If not you need to calibrate your ESC.
If that all works, now you should turn on each motor on its own using the individual motor sliders. Here you are testing that when you move the motor 1 slider up in betaflight, the motor 1 on your quadcopter starts spinning (bottom right motor), and spins in the correct rotation (clockwise). If something is not right you will need to fix that before you can fly your quadcopter.
Setup Flight Modes

Before you go out and fly, you should setup the flight modes for your quadcopter. Assuming you are reading this section you are a beginner so I suggest you configure your flight modes according to our beginner flight modes article.
Go Fly
That covers the basics of what you need to configure to get your quadcopter in a flyable state. However there are a lot more settings to tweak and features you can enable to get even more out of your FPV quadcopter drone. This includes fine tuning your PID’s to get your quadcopter to fly more precisely, or enable advanced features like notch filters. You can even add bling by setting up some colour LED’s.
I do suggest you first try to read up on each topic before playing around with the settings, we have a bunch of guides here on dronetrest, but there are loads around the internet. It ultimately depends how far down the rabbit hole you want to get.
If you have any questions be sure to ask over on our friendly drone forums. And I hope this article helped out. Also if you have any suggestions or tips, please let me know on the forums.


